


A realtor marketing materials checklist is a structured list of print, sign, and large-format assets an agent needs before, during, and after a listing. It ensures nothing is missed, speeds execution, and keeps branding consistent. At 5004 Timberlea Blvd Unit#18, our Mississauga team assembles these essentials for same-day pickup so you’re always ready.
By Top Realtor Sign & Print • Last updated: May 14, 2026
At a Glance Summary
Use this realtor marketing materials checklist to prep fast, look consistent, and stay compliant. Gather core yard signs, print staples, brand enhancers, and large-format displays. Pair them with a simple weekly workflow, local pickup in Mississauga, and an online design tool to reduce stress and win more listings in 2026.
Here’s what you’ll find in this complete guide, purpose-built for busy Ontario agents and brokerages.
- What this checklist is, why it matters now, and how to use it without extra admin.
- A field-tested inventory of signs, print collateral, and event displays most listings require.
- Branding, quality, and compliance tips that protect your reputation.
- Local pickup guidance for Mississauga and the Regional Municipality of Peel.
- Actionable tools, mini case studies, and quick FAQs you can share with your team.
What Is a Realtor Marketing Materials Checklist?
A realtor marketing materials checklist is a ready-to-run inventory of the signs, print pieces, and displays that support a listing from pre-launch to sold. It standardizes what to order, when to deploy it, and how to keep branding consistent—so agents move faster, waste less, and deliver a better client experience.
Think of it as your pre-flight list for listings. When everything is standardized—yard signs, riders, flyers, postcards, brochures, door hangers, and open house assets—you can focus on service, not scrambling. The checklist also becomes your onboarding tool for assistants and new team members.
- Pre-listing: Business cards, presentation folders, listing flyers, and postcards prepare you for the first appointment.
- On market: For Sale panels, directional arrows, riders, and roll-up banners create visibility and guide traffic.
- Conversion: Brochures and takeaways keep your value in hand after showings and open houses.
- Post-sale: “Just Sold” postcards and updated riders drive new valuations and referral conversations.
In our experience helping Ontario brokerages, teams that adopt a shared checklist cut prep time, reduce last-minute runs, and keep their brand tight across every touchpoint—from yard to inbox.
Why This Checklist Matters in 2026
Listings move quickly, and buyers expect polished, consistent experiences. A modern checklist eliminates delays, avoids branding drift, and ensures signs and print arrive on time. With local pickup and same-day options, agents can respond to last-minute listing changes without compromising quality or compliance.
Here’s the thing—speed without structure creates mistakes. Images get mis-sized, brand colors shift, and disclosures slip. A tight checklist gives you command of the process when timelines compress and expectations rise.
- Consistency protects trust: Matching colors, fonts, and layout reinforce credibility across signs, flyers, and folders.
- Less rework: Standardized specs reduce file fixes, reprints, and install do-overs that eat calendar time.
- Compliance peace of mind: Your list reminds you to include brokerage identifiers and accurate claims.
- Event agility: Open house dates shift; pre-packed kits keep you prepared for weather and traffic detours.
We regularly see teams gain a full day back per listing week by saving a base order set, assigning pickup times, and keeping a trunk kit with spares. That time goes back to client service, not logistics.
The Complete Checklist (with specs)
Use this complete realtor marketing materials checklist to cover yard signs, print staples, brand enhancers, and event displays. Standardize specs once, then reuse them for every listing. Add QR codes and tracking to learn what works. Reorder from saved projects to convert prep time into client time.
Below is a practical, on-the-ground checklist shaped by real orders we fulfill for Ontario agents and brokerages. Where helpful, we link to deeper guides and product categories so you can move from reading to doing in minutes.
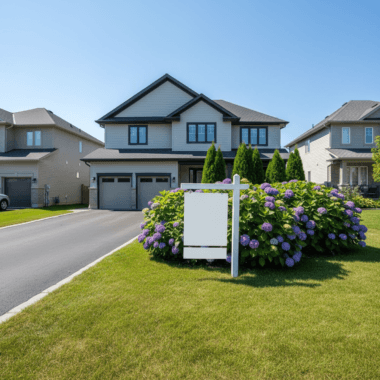
Core yard signage
Yard signage works around the clock. It builds neighborhood awareness, helps buyers self-navigate, and signals an organized listing. Durable materials and legible layouts matter more than ornamentation.
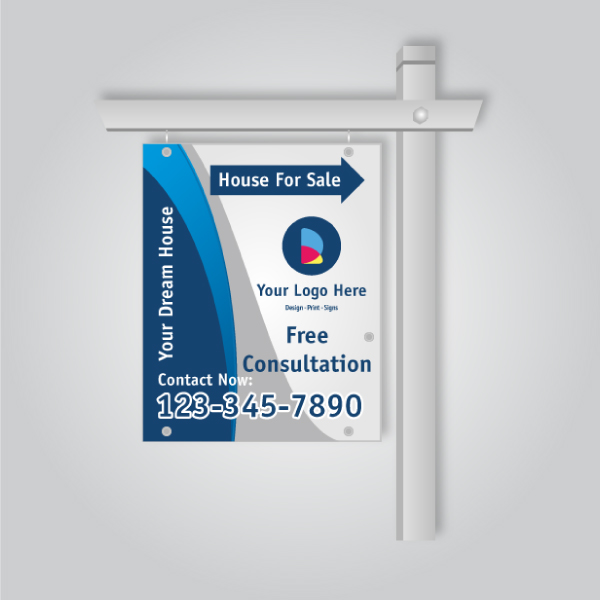
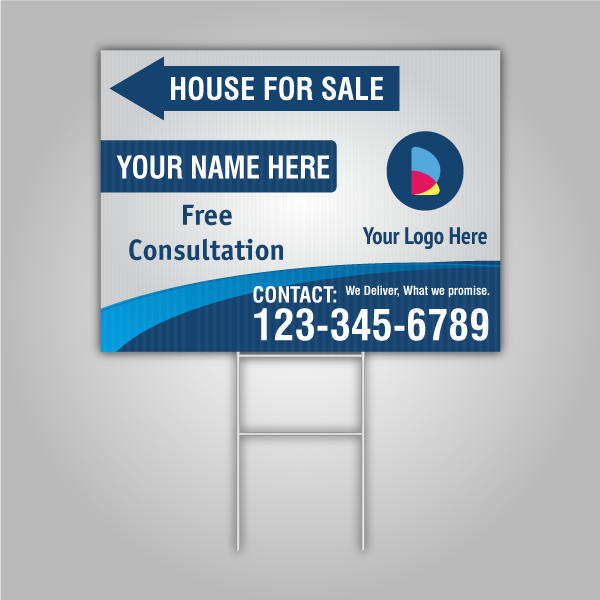
- For Sale sign panel: High-contrast design, bold agent/brokerage identifiers, and clean whitespace. See practical design factors in our good For Sale signs guide.
- Directional signs (arrows): Place at decision points on the route; keep arrows consistent and visible from a car at 25–35 mph.
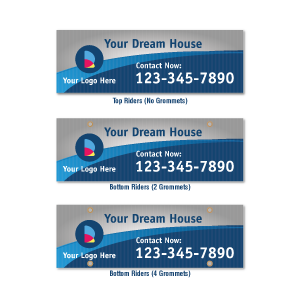
- Custom riders: “Coming Soon,” “Just Listed,” “Open House Sat/Sun,” feature callouts, and QR codes to the listing page.
- Insert signs: Swappable dates and times reduce reprints when plans shift. Keep spares in your trunk.
- Hardware kit: Stakes, zip ties, mallet, gloves, and alcohol wipes for fast, safe installs.
Action tip: Sketch a standard three-turn route from major roads to your listing. It becomes your default plan for arrows so any team member can stage quickly.
Print staples (every listing)
Printed leave-behinds carry your message into kitchens and offices after the showing. Prioritize clarity, benefits, and a clear next step. Keep file specs consistent so reorders are a one-click process.
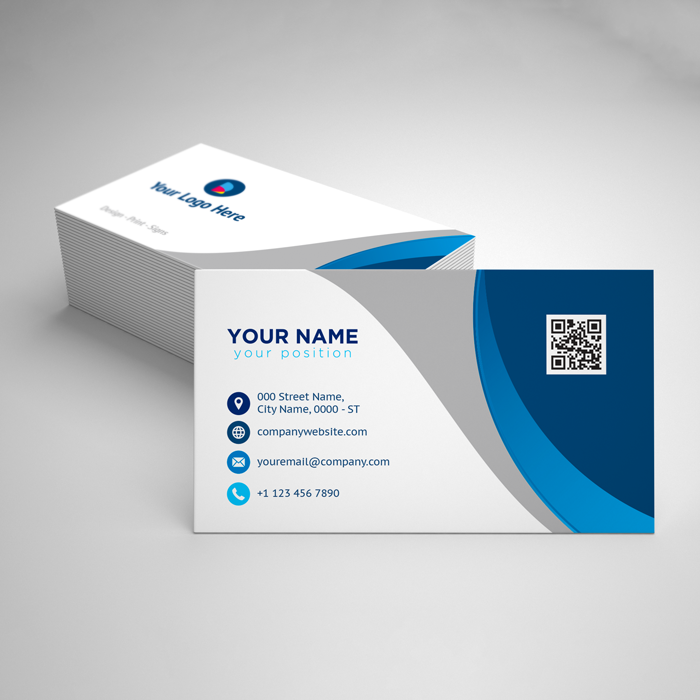
- Business cards: Stock extras for showings and networking; consider a premium finish for VIP appointments.
- Flyers (feature sheets): One-page highlights with 4–6 photos, bullet benefits, and a QR code to the listing page. Layout tips live in our realtor flyer design guide.
- Brochures: Tri-fold or Z-fold for floor plans, community context, and value story. Keep headings short and scannable.
- Postcards: “Just Listed” and “Just Sold” notices for neighborhood farming. Use a scannable QR and a short URL.
- Door hangers: Neighbor invites to the first open house. See targeting approaches in our door hanger playbook.
- Presentation folders: Organize disclosures, CMA summaries, testimonials, and a compact service menu for listing appointments.

Brand enhancers (high-impact)
Small touches change perception fast. Tactile finishes and thoughtful add-ons signal professionalism and care—subtle cues that set your team apart in competitive appointments.
- Luxury business cards: Soft touch, raised spot UV, and metallic foil finishes create a memorable handoff. Streamline your choices with our luxury card guide.
- Stickers: Brand lockups for folders, packaging, pop-by gifts, and welcome kits.
- Notepads and calendars: Useful, long-lived branded items that stay on desks and fridges for months.
- Table tent cards: Summarize features at broker opens or during high-traffic open houses.
These items don’t replace fundamentals—they amplify them. Use sparingly where the impact is highest: listing appointments, luxury segments, and community events.
Large-format and event assets
Events and high-traffic areas reward strong visuals. Portable, durable displays keep your brand present without constant supervision.
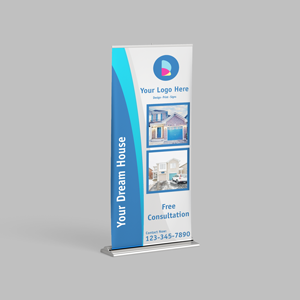
- Roll-up banner: A vertical brand beacon for entryways, condo lobbies, or photo backdrops. Aim for anti-glare finishes under bright lights.
- Poster boards: Floor plans, timeline graphics, before/after visuals, and neighborhood maps—mounted for stability.
- Tabletop signage: Feature highlights, financing-friendly notes, or QR codes for instant mobile access.
Practical note: Store banners and poster boards flat and protected; it preserves edges and avoids creasing between events.
Digital-to-print bridges
Make your print interactive so every touchpoint routes to your digital hub. Clear calls-to-action and scannable elements convert curb interest into website visits and inquiries.
- QR codes: Link flyers, riders, and banners to the listing page or lead form. Use unique codes per asset to see which placements perform best.
- Short URLs: Add a branded, easy-to-type link as a fallback for phones that can’t scan from a distance.
- Tracking: UTM parameters and separate codes per asset type turn your kit into a learning engine.
Quick spec and timing planner
Standardize once, then reuse. Here’s a simple planner many teams adopt to align creative, print, and fieldwork.
| Material | Primary use | Recommended spec | When to order |
|---|---|---|---|
| For Sale sign panel | Curbside visibility | High contrast, weather-resistant, reflective options | As soon as listing signed |
| Directional signs | Guide traffic to open house | Arrows, sturdy stakes, consistent route | 48–72 hours before event |
| Flyers | Takeaways at showings | Crisp photos, bullet layout, QR to page | When photography is final |
| Brochures | Deeper storytelling | Tri-fold or Z-fold, map panel | Pre-listing appointment |
| Postcards | Neighborhood farming | Clear CTA, route map | Just listed/sold moments |
| Roll-up banner | Open-house entry branding | Stable base, glare-free finish | At listing launch |
How to Work the Checklist Into Your Weekly Workflow
Turn your checklist into a repeatable workflow: create a saved order set, assign timelines to each asset, and use local pickup to handle schedule shocks. Store spare signs and riders in your car kit. Review and restock every Friday so next week’s listings are launch-ready.
Here’s a simple, agent-friendly routine we see succeeding across Ontario teams. It reduces decision fatigue and keeps your calendar focused on conversations, not curbside chores.
- Save your base kit: Yard panel, riders, directional arrows, flyers, postcards, and a roll-up banner as one saved project.
- Build a car kit: Zip ties, stakes, a mallet, gloves, alcohol wipes, and extra riders live in your trunk so installs are always possible.
- Friday reset: Place reorders and schedule pickups for the coming week’s listings. Confirm photography times before printing feature sheets.
- Photo lock, then print: Approve photography and push flyers/brochures to print the same day to protect freshness.
- QR hygiene: Use unique codes per listing and per asset so future reporting is meaningful and optimizations are evidence-based.
- Event rhythm: Stage directional signs the morning of your open house; retrieve and inspect them after for damage.
Bonus: If you host back-to-back opens, keep two full sets of directional arrows. It prevents last-minute scavenger hunts after a rainstorm or route change.
Best Practices: Quality, Branding, and Compliance
Prioritize legibility, durable materials, and brokerage-compliant branding. Use high-contrast layouts, readable type, and weatherproof substrates for signs; reserve premium finishes for high-impact touchpoints. Include required brokerage and licensing details on signs and ensure advertising claims are fair, accurate, and supportable.
Quality is noticed. So is sloppiness. These practices keep you on the right side of perception and policy in real-world listing conditions.
- Legibility first: Short headlines, generous spacing, and strong contrast are non-negotiable at curb distance and drive-by speeds.
- Color and fonts: Lock brand colors and 1–2 typefaces; store them in your design profile to prevent drift as teams grow.
- Photo standards: Use evenly lit, true-to-life images; avoid heavy filters that misrepresent rooms or exterior color.
- Weather readiness: Choose substrates and inks built for Ontario seasons; secure signs against wind and thaw cycles.
- Disclosure discipline: Reserve space for brokerage-identifying info and any required license or registration identifiers.
- Claims and comparatives: Keep benefits accurate and supportable; avoid superlatives you can’t substantiate. For seller perspective, skim a homeowner-facing FSBO checklist to see how marketing claims land.
When in doubt, have a peer review your sign proofs and feature sheets before printing. A second set of eyes prevents typos and off-brand color mixes from landing in front yards.
Tools and Resources (Templates, Design, and Learning)
Use an online design tool, saved order templates, and simple tracking to streamline production. Lean on expert guides for flyer layouts and sign strategy, and skim general real estate checklists for perspective. Keep resources centralized so you and your team can launch every listing the same way.
Centralize your toolkit and the work gets lighter. Here are practical resources agents use weekly to go from idea to install in hours, not days.
- Online design tool: Build print-ready files in your browser—no pro software required. Browse our marketing materials category to start from proven templates.
- Saved bundles: Package your recurring items and keep them under a single project name for one-click reorders.
- Deep-dive articles: Flyer layout, sign legibility, and premium card finishes are covered in our product and guide pages linked throughout this checklist.
- Client-facing prompts: Use a questions to ask pros guide to shape your seller/buyer handouts and set expectations.
- Move-in readiness ideas: A concise home insurance checklist can inspire practical tips you add to welcome folders.
Keep links to your templates, listing photography folder, and QR generator in one shared doc so assistants and team members can execute your standard in minutes.
Local Pickup in Mississauga: What to Know
Pick up your checklist essentials at 5004 Timberlea Blvd Unit#18 in Mississauga for rapid turnarounds across the Regional Municipality of Peel. Plan routes around peak traffic, and pre-schedule pickups for the day your photography is ready. Same-day options keep open houses on track even when plans change.
Local logistics matter, especially when listings accelerate or schedules shift. Tight coordination between photography, print, and sign staging makes the difference between a calm weekend and a scramble.
- Batch orders, single pickup: Coordinate sign panels, riders, flyers, and postcards to minimize trips and reduce gaps.
- Event timing: Align roll-up banner and directional sign pickups with confirmed open house dates to avoid morning-of errors.
- Weather buffers: Keep spare riders and arrows on hand for rain/wind contingencies so routes remain clear.
Local considerations for 5004 Timberlea Blvd Unit#18
- Time pickups to avoid rush near Tomken Road corridors; if needed, stage materials the day before a weekend open house near Parkway Belt Dog Park routes.
- Seasonality counts: late fall and early spring bring wet ground—pack extra stakes and gloves for directional signs.
- Serving the Regional Municipality of Peel? Group orders for multi-listing weekends to standardize your kit and conserve drive time.

Case Studies & Examples
Teams that standardize a listing kit reduce prep stress and create smoother events. The most consistent results come from a reusable checklist, saved order templates, and local pickup. These examples show how agents turn a one-time scramble into a repeatable, brand-true routine.
Here are quick, anonymized snapshots based on common scenarios we support across Ontario. Use them to benchmark your own routine and spot bottlenecks in your process.
- “Just signed” sprint (detached home): Agent locks photography on Tuesday, reorders a saved kit (panel, riders, flyers, postcards) the same morning, and picks up Thursday. Open house arrows go out Saturday at 9 a.m.; turnout is steady and signage stays consistent through the weekend.
- Condo lobby presence: A roll-up banner and tabletop sign turn a quiet lobby into a brand-forward entry. Flyers with QR codes feed listing views and capture email leads during building walk-ins; the banner anchors your brand for photos.
- Farming a new pocket: Door hangers and postcards around the listing announce the open house date. A week later, a “Just Sold” postcard reinforces results and drives valuation inquiries from curious neighbors.
- Team onboarding: New assistant joins; the saved order set and car kit checklist help them run installs confidently by week two. Errors drop because the visuals and steps are standardized.
We’ve found that teams who keep a spare set of directional arrows plus an extra QR-enabled rider avoid last-minute changes torpedoing event flow. Simple redundancy keeps weekends predictable.
Need a ready-to-run kit? Our team can set up your reusable template bundle and schedule pickups to match your listing cadence. Ask about saved projects and quick file checks to keep your brand tight.
Explore realtor packages and tell us your target neighborhoods and timelines.
Frequently Asked Questions
Agents ask about essentials, timing, and signage compliance. The best approach is to standardize a base kit, add property-specific pieces as needed, and schedule local pickups around photography and open house dates. Keep QR codes unique and proof your files for legibility and brand alignment.
What should be in a basic realtor marketing materials checklist?
Include a For Sale sign panel, directional arrows, riders, business cards, flyers, brochures, postcards, a roll-up banner, and presentation folders. Add stickers or notepads for brand touchpoints and QR codes that drive to your listing page or lead form.
When should I order materials for a new listing?
Order the base kit when the listing paperwork is signed. Approve photography, then send flyers and brochures to print the same day. Schedule local pickup to align with your open house date and build a trunk kit so you can respond to weather or route changes.
How do I keep branding consistent across all pieces?
Lock your color values and fonts in your template files, and save a master design in your online tool. Use the same logo placement, headline style, and CTA language across signs and print. Have a teammate proof layout and color before printing.
Do QR codes really help on print materials?
Yes. QR codes bridge in-person interest to your listing page or lead form. Use unique codes per asset so you can see what’s working. Place them where a phone can scan comfortably—about 1–2 inches wide on flyers and larger on signs.
Conclusion & Key Takeaways
A reusable realtor marketing materials checklist turns frantic prep into a calm, repeatable system. Standardize specs, bundle recurring items, and lean on local pickup to keep launches on schedule. With a clear kit and workflow, your brand looks consistent and your listings move faster.
When your base kit is saved and your pickup rhythm is set, listings feel lighter. You’re no longer reinventing the wheel—you’re running a playbook.
Key Takeaways
- Standardize once: Lock specs and templates to eliminate rework.
- Bundle your kit: Save a reusable order set for every listing.
- Make print interactive: Use QR codes and short URLs to capture intent.
- Plan pickups: Align Mississauga pickups with photography and open house timing.
- Protect brand and compliance: Prioritize legibility and accurate identifiers across all signage.
Ready to operationalize your checklist? Our team at 5004 Timberlea Blvd Unit#18 can assemble your kit, proof your files, and schedule pickups so you can focus on clients. Start your listing kit today.